Pushing real-time updates to clients with Server-Sent Events (SSEs)

Introduction
In multi-page web apps, there’s a pretty common flow that comes up:
A user loads a specific page or hits a button that kicks off a long-running task. On the backend, a background worker grabs that task and starts processing it asynchronously. Meanwhile, the page stays put—it shouldn't reload or block while all this is going on. As the task runs, the server needs a way to keep the client updated with the status in real time. Then once it’s done, the client should display a success or error message based on the result.
Now, the go-to tool when you need real-time, bidirectional communication is usually WebSockets. But in this case, it’s actually a one-way street: the client triggers something, and then it’s the server pushing updates back as the background job progresses.
Personally, when I’m working in Django and I need real-time updates, I usually reach for the Django Channels library. It’s great for full duplex communication and handles WebSockets really well. But let’s be honest—it can be a bit of a pain to set up, especially if you're not fully leveraging all its capabilities or you're not even in Django land. Plus, WebSockets can be flaky, and there's some overhead to deal with.
So I started looking for something lighter, and that's when I landed on Server-Sent Events (SSEs). They’re actually a solid alternative when all you need is one-way streaming from the server to the client. Simple, clean, and they just work for this kind of use case.
Server-Sent Events (SSEs)
Server-Sent Events (SSEs) are a neat way to push real-time updates from the server to the browser—without the client having to ping the server every few seconds. Instead of polling, the server just streams updates as they happen. Think live chat, news tickers, stock prices—basically any situation where you only need one-way updates, from server to client. But if you need two-way comms (like sending real-time data from the client too), then yeah, you’re back in WebSocket territory.
The nice part about SSEs is they run over plain old HTTP. That means no special protocol or fancy server setup required. Compare that with WebSockets, which need a full-duplex connection and something like Daphne to handle the WebSocket protocol. SSEs also have a few nice built-in features that WebSockets just don’t—like automatic reconnections, event IDs, and custom event types. That’s a win, especially on the frontend, since you don’t have to hand-roll a bunch of reconnect logic yourself.
Honestly, the biggest reason I started digging into SSEs was because of how simple they are—and the fact that they stay in the HTTP world. If you're curious how they really stack up against WebSockets, Germano Gabbianelli wrote a great post on the topic that’s definitely worth a read.
The Wire Protocol (How SSE Actually Works)
The SSE wire protocol is super simple and runs right on top of plain old HTTP. All the server has to do is send a stream of data with a specific structure. Here’s what a typical SSE response might look like:
// Source https://developer.mozilla.org/en-US/docs/Web/API/Server-sent_events/Using_server-sent_events
date_default_timezone_set("America/New_York");
header("X-Accel-Buffering: no");
header("Content-Type: text/event-stream");
header("Cache-Control: no-cache");

$counter = rand(1, 10);
while (true) {
  // Every second, send a "ping" event.

  echo "event: ping\n";
  $curDate = date(DATE_ISO8601);
  echo 'data: {"time": "' . $curDate . '"}';
  echo "\n\n";

  // Send a simple message at random intervals.

  $counter--;

  if (!$counter) {
    echo 'data: This is a message at time ' . $curDate . "\n\n";
    $counter = rand(1, 10);
  }

  if (ob_get_contents()) {
      ob_end_flush();
  }
  flush();

  // Break the loop if the client aborted the connection (closed the page)

  if (connection_aborted()) break;

  sleep(1);
}
A simple example
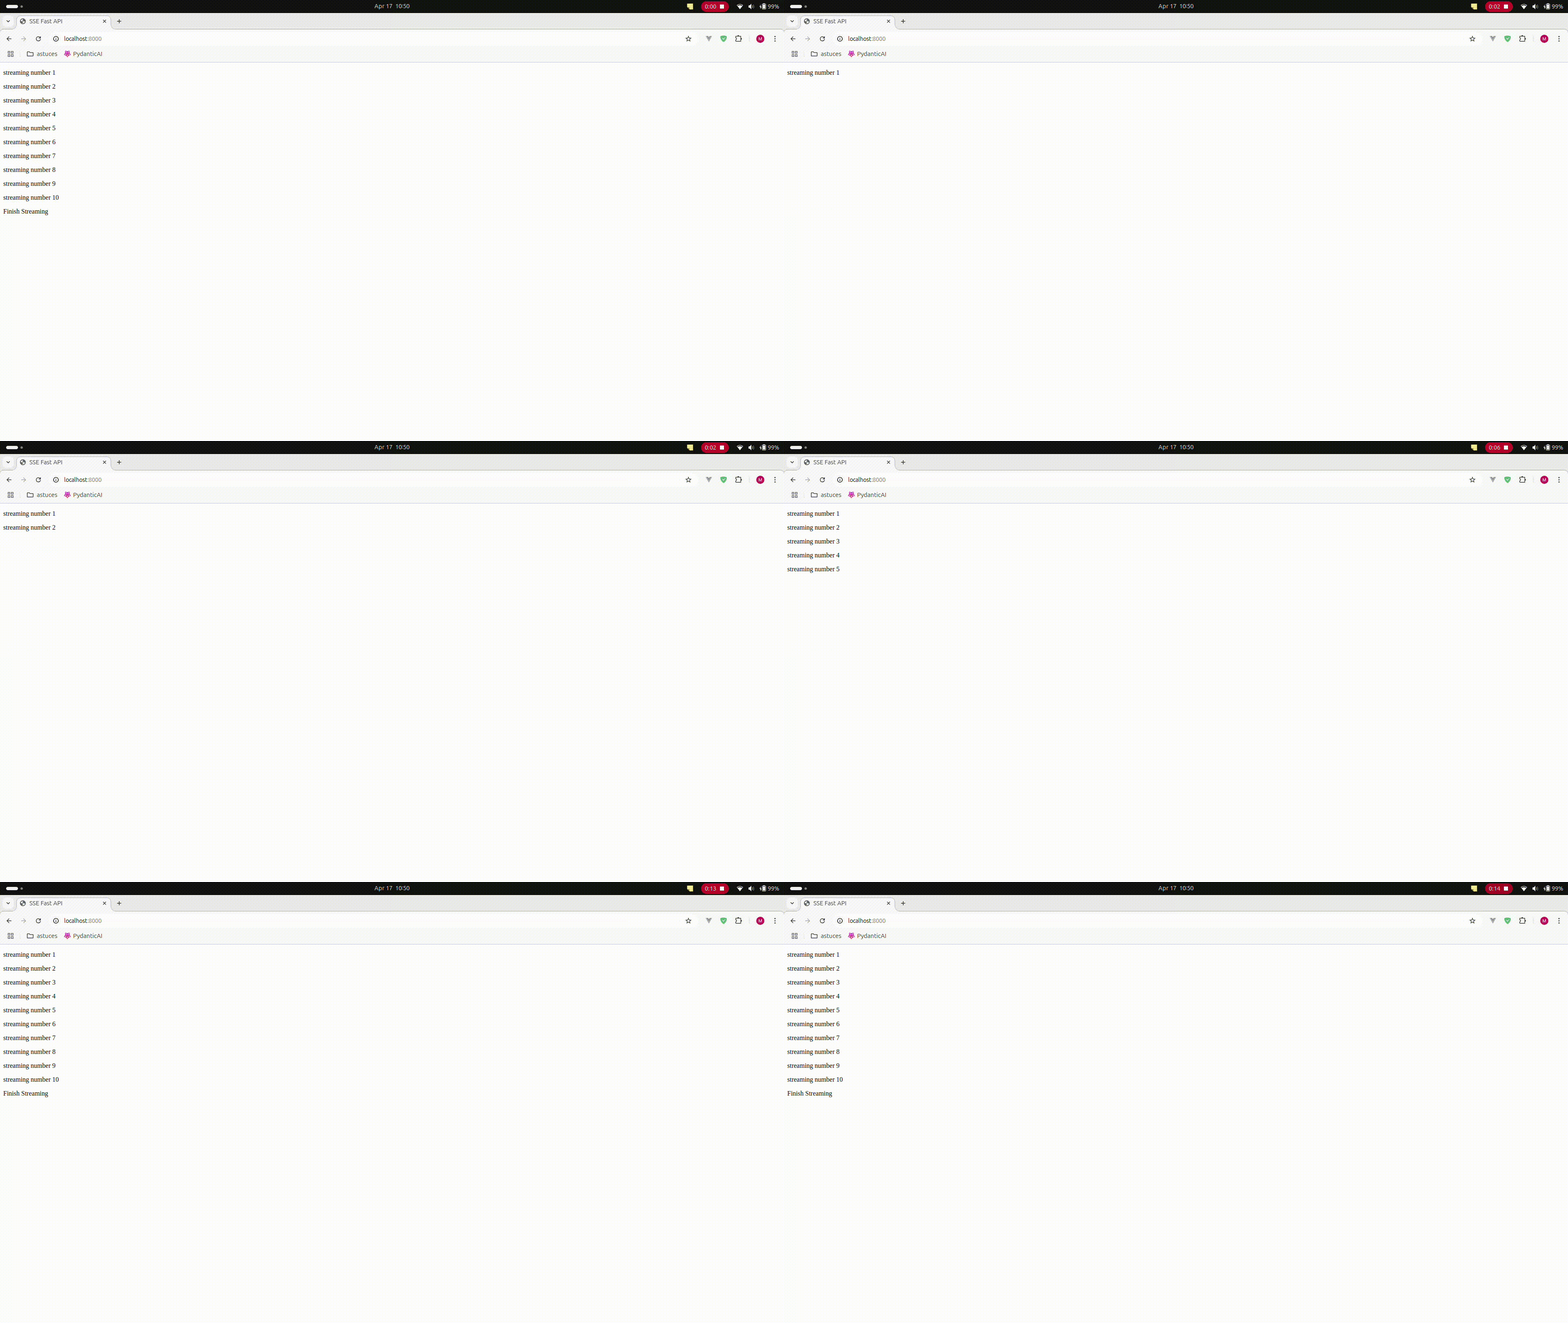
In this section, I’ll prop up a simple HTTP streaming server with FastAPI and collect the events from the browser. Here’s the complete server implementation:
import asyncio
from typing import AsyncGenerator

from fastapi import FastAPI,Request
from fastapi.responses import HTMLResponse, StreamingResponse
from fastapi.templating import Jinja2Templates

app = FastAPI()

# For the demo, we serve the html via FastAPI
templates = Jinja2Templates(directory="templates")

@app.get("/", response_class=HTMLResponse)
async def index(request:Request):
    return templates.TemplateResponse(request=request,name="index.html")

@app.get("/stream", response_class=StreamingResponse)
async def stream(request:Request):
    async def _stream() -> AsyncGenerator[str, None]:
        for number in range(1,11):
            if await request.is_disconnected():
                break
            yield f"event:stream\ndata:streaming number {number}\n\n"
            await asyncio.sleep(1)

            if number ==10:
                break
    return StreamingResponse(
        _stream(),
        media_type="text/event-stream",
        headers={
            "Content-Type": "text/event-stream",
            "Access-Control-Allow-Origin": "*",
            "Cache-Control": "no-cache",}
            )


if __name__ == "__main__":
    import uvicorn
    uvicorn.run("main:app", port=8000, reload=True)
The server exposes a /stream endpoint that will just continuously send data to any connected client. The stream function returns a StreamingResponse object that the framework uses to send SSE messages to the client. Internally, it defines an asynchronous generator function _stream which produces a sequence of messages that follows the SSE wire protocol and yields them line by line.
The index / page is there so that you can head over to it in your browser and paste the client-side code.
The content of index.html page:
<!DOCTYPE html>
<html lang="en">

<head>
    <meta charset="UTF-8">
    <meta name="viewport" content="width=device-width, initial-scale=1.0">
    <title>SSE Fast API</title>
</head>

<body>
    <div class="events">

    </div>
    <script>
        const eventSource = new EventSource("/stream");
        eventSource.onopen = () => console.log("Connected to the server");

        eventSource.addEventListener("stream", (event)=>{
            const text = document.createElement("p")
            text.innerText = event.data
            document.querySelector(".events").appendChild(text)
        })

        eventSource.onerror = () => {
            eventSource.close()
            const text = document.createElement("p")
            text.innerText = "Finish Streaming"
            document.querySelector(".events").appendChild(text)
        }
    </script>
</body>

</html>
Result

Real-World Scenario: Background Task Progress with SSE
Let’s walk through the scenario I mentioned earlier: you load a specific page in your browser, and that kicks off a long-running background task powered by Celery. While that task is doing its thing in the background, the server keeps the browser updated on its progress in real time.
As soon as the task wraps up, the server sends a final message letting the client know it's done, and the browser can update the DOM accordingly—maybe show a success message, refresh part of the UI, or whatever makes sense.
What’s nice here is that the communication is entirely one-way. The client kicks things off, and after that, it’s just the server pushing updates until the task completes. No need for polling. No need for bidirectional messaging. And that’s exactly where Server-Sent Events shine—SSE is a perfect fit for this kind of workflow.
To test it out, you’ll need to install a few dependencies. Here I use uv, but you can pip install if you use pip:
uv add 'celery[redis]'
>
Resolved 56 packages in 305ms
Prepared 2 packages in 109ms
Installed 14 packages in 17ms
 + amqp==5.3.1
 + billiard==4.2.1
 + celery==5.5.1
 + click-didyoumean==0.3.1
 + click-plugins==1.1.1
 + click-repl==0.3.0
 + kombu==5.5.3
 + prompt-toolkit==3.0.51
 + python-dateutil==2.9.0.post0
 + redis==5.2.1
 + six==1.17.0
 + tzdata==2025.2
 + vine==5.1.0
 + wcwidth==0.2.13
You’ll also need to set up a Redis server that Celery will use for broker communication. If you have Docker installed in your system, you can run the following command to start a Redis server:
docker run --name dev-redis -d -h localhost -p 6379:6379 redis:alpineThe main.py contains the server implementation that looks like this:
import asyncio
import json
import time
from typing import AsyncGenerator
from functools import cache

from celery import Celery

import redis
import redis.asyncio as aredis

from fastapi import FastAPI,Request
from fastapi.responses import HTMLResponse, StreamingResponse
from fastapi.templating import Jinja2Templates

app = FastAPI()
celery_app = Celery("tasks", backend="redis://", broker="redis://")


@cache
def get_async_client() -> aredis.Redis:
    return aredis.from_url("redis://localhost:6379")

@cache
def get_client() -> redis.Redis:
    return redis.from_url("redis://localhost:6379")


@celery_app.task(bind=True)
def very_long_job(self) -> str:
    with get_client() as client:
        for number in range(1,101):
            client.publish(self.request.id, str(number))
            time.sleep(0.5)
    client.close()

# For the demo, we serve the html via FastAPI
templates = Jinja2Templates(directory="templates")

@app.get("/", response_class=HTMLResponse)
async def index(request:Request):
    return templates.TemplateResponse(request=request,name="index.html")

@app.post("/")
async def start_job():
    task = very_long_job.apply_async(queue="default")
    return {"job_id":task.id}

@app.get("/stream/{job_id}", response_class=StreamingResponse)
async def stream(request:Request, job_id:str):
    async def _stream() -> AsyncGenerator[str, None]:
        try:
            async with get_async_client().pubsub() as pubsub:
                await pubsub.subscribe(job_id)
                while True:
                    msg = await pubsub.get_message(ignore_subscribe_messages=True, timeout=None)
                    if msg is None:
                        continue
                    data = json.loads(msg["data"])

                    yield f"event:progress\ndata:{data}\n\n"

                    if data ==100:
                        yield f"event:success\ndata:Job Succeeded\n\n"
                        break
                    if await request.is_disconnected():
                        break

        except asyncio.CancelledError:
            raise
    return StreamingResponse(
        _stream(),
        media_type="text/event-stream",
        headers={
            "Access-Control-Allow-Origin": "*",
            "Cache-Control": "no-cache",}
            )


if __name__ == "__main__":
    import uvicorn
    uvicorn.run("main:app", port=8000, reload=True)
Here, first, we initialize a FastAPI app and set up Celery with Redis as both the broker and result backend. We also configure two Redis clients: one synchronous (used by the Celery worker) and one asynchronous (used within FastAPI for real-time message streaming).
Next, we define a Celery task called very_long_job that simulates a long-running background process. It loops from 1 to 100, and at each step, it publishes the current number to a Redis pub/sub channel named after the task's unique ID. This creates a real-time stream of progress updates.
The index route (/) serves a simple HTML page using Jinja2 templates. When a user submits a request (typically via a button or form), a POST call to / triggers the Celery task asynchronously. The response returns the job_id, which the frontend can use to track the progress.
Then, we expose a /stream/{job_id} route that leverages Server-Sent Events (SSE) to push updates to the frontend. This endpoint listens to the corresponding Redis pub/sub channel and streams progress messages (event: progress) to the client as they are published. These updates allow the frontend to dynamically show the status of the background task—such as updating a progress bar in real time.
To avoid resource leaks or infinite connections, the stream breaks if either the task reaches 100% completion or the client disconnects.
In short, this architecture cleanly separates concerns:
-
Celery handles long-running logic without blocking the main app.
-
Redis pub/sub provides lightweight real-time messaging.
-
SSE pushes live updates to the frontend for a smooth user experience.
This setup is perfect for use cases like video processing, data analysis, or any background work where users expect immediate feedback on progress.
The content of index.html is like this:
I use Bulma to get some style
<!DOCTYPE html>
<html lang="en">

<head>
    <meta charset="UTF-8">
    <meta name="viewport" content="width=device-width, initial-scale=1.0">
    <link rel="stylesheet" href="https://cdn.jsdelivr.net/npm/bulma@1.0.2/css/bulma.min.css">
    <title>SSE Fast API</title>
</head>

<body>
    <section class="hero is-fullheight">
        <div class="hero-body">
            <div class="container has-text-centered">
                <p class="title">Processing Task ...</p>
                <progress class="progress is-primary" min="0" max="100" value="0"></progress>
                <button class="button is-link">Start Task</button>
            </div>
        </div>
    </section>
    <script>
        const btn = document.querySelector(".button").addEventListener("click", () => {

            fetch("",{method:'POST'})
            .then(jsonResponse=>jsonResponse.json())
            .then(data=>{
                const jobId = data.job_id;

                const eventSource = new EventSource(`/stream/${jobId}`)
                eventSource.onopen = () => console.log("Connected");
                eventSource.onerror = () => eventSource.close()
                eventSource.addEventListener("progress", event=>{
                    document.querySelector(".progress").value=event.data
                })
                eventSource.addEventListener("success", event=>{
                    document.querySelector(".title").textContent=event.data
                    eventSource.close()
                })

            })

        })
    </script>
</body>

</html>
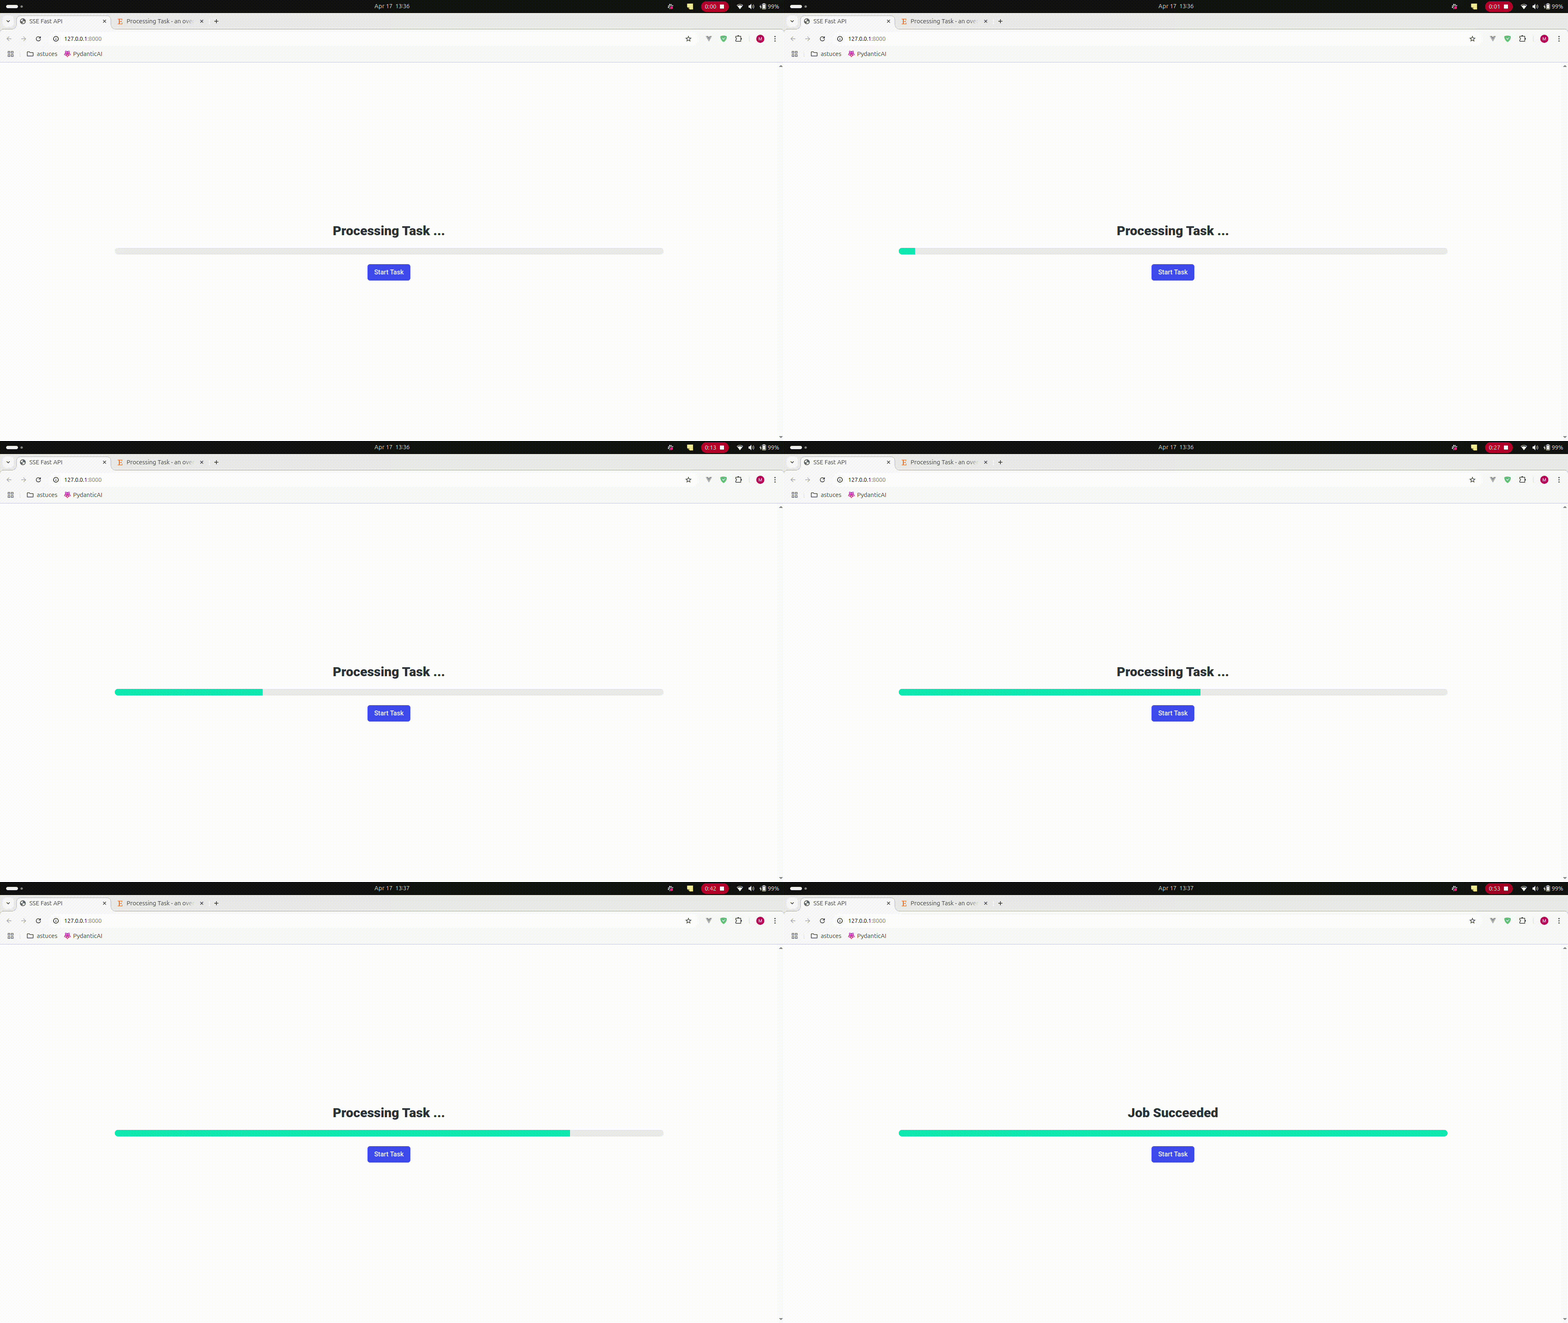
This code defines a simple web page that allows users to start a background task and visually track its progress in real time. The interface includes a progress bar and a button to initiate the task. When the user clicks the button, the browser sends a request to the backend to launch the task. The server responds with a unique identifier for that task.
Once the task is started, the frontend opens a live connection to the server using Server-Sent Events (SSE), a technology that allows the server to push updates to the browser over time. Through this connection, the server sends periodic messages indicating the task’s current progress. These messages are used to update the progress bar, giving the user live feedback.
When the task reaches completion, the server sends a final message indicating success. The frontend then updates the page title to reflect that the task is done and closes the connection. Overall, the setup provides a seamless, real-time way for users to follow the execution of a long-running task without refreshing the page or constantly polling the server.
To run the Project:
uvicorn main:app --port 8000 --reload
On another terminal, start the celery workers:
celery -A main.celery_app worker -l info -Q default -c 1Result Overview

Github source
Final Words
Server-Sent Events (SSE) can be a great way to push real-time updates from the server to the client, but a lot of developers overlook key risks that come with using it. First, scalability is a major concern—each client keeps a connection open, which eats up server resources fast as your user count grows. Plus, browsers limit how many connections you can make per domain, so that’s another bottleneck.
Compatibility can also be tricky. Older browsers (like Internet Explorer) don’t support SSE, and some networks or proxies might block the open connection SSE needs to work. Then there’s reconnection—SSE will try to reconnect if it drops, but if you don’t handle it right on the server side, you might get duplicate or missing messages. Using message IDs or timestamps helps with that.
Security-wise, SSE runs over HTTP unless you secure it with HTTPS, so make sure to encrypt your streams and handle auth properly. Also, SSE only supports text data natively, so if you need to send binary data, you’ll have to encode it (e.g. base64), which isn’t ideal. In those cases, WebSockets might be a better fit.
Lastly, debugging SSE can be a pain—most tools don’t support it well.
Bottom line: SSE is useful, but it comes with caveats. Know what you’re getting into before relying on it for anything mission-critical.