Create PDF files with Django & Weasyprint
Introduction
When building business-oriented web applications with Django, a common requirement is to generate PDF documents; for example invoices, quotes, receipts or reports. While Django handles the HTML web interface easily, turning HTML + CSS into a polished PDF can be tricky. That’s where WeasyPrint comes in: it’s a library that renders HTML and CSS to PDF and works nicely in a Django context.
In this article we’ll build a simple "Invoice Generator" application: you’ll define a model for Invoice, render an invoice template in HTML, then provide a Django view that uses WeasyPrint to generate a downloadable PDF. We’ll cover project structure, installation, template design, view logic and tips for integration (handling static files, stylesheets, page breaks etc). At the end you’ll have a reusable setup you can adapt for any kind of document generation.
Project Setup
Create a virtual environment. Then install Django and WeasyPrint, here I use uv python package and project manager
mkdir djangoweasyprint && cd djangoweasyprint
uv init .
uv add django weasyprit
source .venv/bin/activate
django-admin startproject config .
Note: On Linux (Debian/Ubuntu) you may need to install system dependencies such as libpango1.0-0, libcairo2, libffi-dev etc:
sudo apt install libpango-1.0-0 libpangoft2-1.0-0 libharfbuzz-subset0 libffi-dev.
├── README.md
├── config
│ ├── __init__.py
│ ├── asgi.py
│ ├── settings.py
│ ├── urls.py
│ └── wsgi.py
├── manage.py
├── pyproject.toml
└── uv.lockIn your Django settings.py, ensure your STATIC_URL and STATIC_ROOT or STATICFILES_DIRS are properly configured so that assets like CSS, fonts or images used in the invoice template can be resolved when generating the PDF.
# // more code above
TEMPLATES = [
    {
        "BACKEND": "django.template.backends.django.DjangoTemplates",
        "DIRS": [BASE_DIR / "templates"],
        "APP_DIRS": True,
        "OPTIONS": {
            "context_processors": [
                "django.template.context_processors.request",
                "django.contrib.auth.context_processors.auth",
                "django.contrib.messages.context_processors.messages",
            ],
        },
    },
]

# //

STATIC_URL = "static/"
STATICFILES_DIRS = [BASE_DIR / "static"]

# //
Now create the billing app in django
python manage.py startapp billing
mkdir -p billing/templates/billing
mkdir -p billing/static/billing/{css,img}
touch billing/templates/billing/invoice_detail.html
rouch billing/static/billing/css/billing.css
.
├── README.md
├── billing
│ ├── __init__.py
│ ├── admin.py
│ ├── apps.py
│ ├── migrations
│ │ └── __init__.py
│ ├── models.py
│ ├── static
│ │ └── billing
│ │ ├── css
│ │ │ └── billing.css
│ │ └── img
│ ├── templates
│ │ └── billing
│ │ └── invoice_detail.html
│ ├── tests.py
│ └── views.py
├── config
│ ├── __init__.py
│ ├── asgi.py
│ ├── settings.py
│ ├── urls.py
│ └── wsgi.py
├── manage.py
├── pyproject.toml
└── uv.lockAdd the billing app to the settings.py INSTALLED_APPS
INSTALLED_APPS = [
    "django.contrib.admin",
    "django.contrib.auth",
    "django.contrib.contenttypes",
    "django.contrib.sessions",
    "django.contrib.messages",
    "django.contrib.staticfiles",
    "billing", # new
]
The models
In billing/models.py, you can define a simple Invoice and InvoiceItem model. For instance:
from django.db import models

class Invoice(models.Model):
    number = models.CharField(max_length=20, unique=True)
    date = models.DateField(auto_now_add=True)
    client_name = models.CharField(max_length=200)
    client_address = models.TextField()
    total = models.DecimalField(max_digits=10, decimal_places=2)
    # … other fields: VAT, terms, etc.

    def __str__(self):
        return f"Invoice {self.number} - {self.client_name}"

class InvoiceItem(models.Model):
    invoice = models.ForeignKey(Invoice, on_delete=models.CASCADE, related_name='items')
    description = models.CharField(max_length=255)
    quantity = models.IntegerField(default=1)
    unit_price = models.DecimalField(max_digits=10, decimal_places=2)

    @property
    def line_total(self):
        return self.quantity * self.unit_price

    def __str__(self):
        return f"{self.description} ({self.quantity} × {self.unit_price})"
This gives you a foreign-key relation: each invoice has many invoice items.
Remember to run python manage.py makemigrations and python manage.py migrate.
Template Design
In billing/templates/billing/invoice_detail.html, craft an HTML representation of the invoice. Because WeasyPrint renders HTML+CSS, you can design the layout exactly how you’d want the PDF to look (header, footer, table of items, totals, page break control, etc). Example:
{%load static%}
<!DOCTYPE html>
<html lang="en">
  <head>
    <meta charset="utf-8">
    <title>Invoice</title>
    <link rel="stylesheet" href="{% static 'billing/css/billing.css' %}">
    <meta name="description" content="Invoice demo sample">
  </head>

  <body>
    <h1>Invoice</h1>

    <aside>
      <address id="from">
        WeasyPrint
        26 rue Emile Decorps
        69100 Villeurbanne
        France
      </address>

      <address id="to">
        Our awesome developers
        From all around the world
        Earth
      </address>
    </aside>

    <dl id="informations">
      <dt>Invoice number</dt>
      <dd>{{ invoice.number }}</dd>
      <dt>Date</dt>
      <dd>{{ invoice.date }}</dd>
    </dl>

    <table>
      <thead>
        <tr>
          <th>Description</th>
          <th>Price</th>
          <th>Quantity</th>
          <th>Subtotal</th>
        </tr>
      </thead>
      <tbody>
        {% for item in invoice.items.all %}
        <tr>
          <td>{{ item.description }}</td>
          <td>{{ item.unit_price }}</td>
          <td>{{ item.quantity }}</td>
          <td>{{ item.line_total }}</td>
        </tr>
        {% endfor %}
      </tbody>
    </table>

    <footer>
      <table id="total">
        <thead>
          <tr>
            <th>Due by</th>
            <th>Total due</th>
          </tr>
        </thead>
        <tbody>
          <tr>
            <td>{{ invoice.date }}</td>
            <td>€{{ invoice.total }}</td>
          </tr>
        </tbody>
      </table>
    </footer>
  </body>
</html>
in the billing/static/billing/css/billing.css, you might include styles such as:
@font-face {
  font-family: Pacifico;
  src: url(pacifico.ttf);
}
@font-face {
  font-family: Source Sans Pro;
  font-weight: 400;
  src: url(SourceSans3-Regular.ttf);
}
@font-face {
  font-family: Source Sans Pro;
  font-weight: 700;
  src: url(SourceSans3-Bold.ttf);
}

@page {
  font-family: Pacifico;
  margin: 3cm;
  @bottom-left {
    color: #1ee494;
    content: '♥ Thank you!';
  }
  @bottom-right {
    color: #a9a;
    content: 'contact@courtbouillon.org | courtbouillon.org';
    font-size: 9pt;
  }
}

html {
  color: #14213d;
  font-family: Source Sans Pro;
  font-size: 11pt;
  line-height: 1.6;
}
body {
  margin: 0;
}

h1 {
  color: #1ee494;
  font-family: Pacifico;
  font-size: 40pt;
  margin: 0;
}

aside {
  display: flex;
  margin: 2em 0 4em;
}
aside address {
  font-style: normal;
  white-space: pre-line;
}
aside address#from {
  color: #a9a;
  flex: 1;
}
aside address#to {
  text-align: right;
}

dl {
  position: absolute;
  right: 0;
  text-align: right;
  top: 0;
}
dt, dd {
  display: inline;
  margin: 0;
}
dt {
  color: #a9a;
}
dt::before {
  content: '';
  display: block;
}
dt::after {
  content: ':';
}

table {
  border-collapse: collapse;
  width: 100%;
}
th {
  border-bottom: .2mm solid #a9a;
  color: #a9a;
  font-size: 10pt;
  font-weight: 400;
  padding-bottom: .25cm;
  text-transform: uppercase;
}
td {
  padding-top: 7mm;
}
td:last-of-type {
  color: #1ee494;
  font-weight: bold;
  text-align: right;
}
th, td {
  text-align: center;
}
th:first-of-type, td:first-of-type {
  text-align: left;
}
th:last-of-type, td:last-of-type {
  text-align: right;
}
footer {
  content: '';
  display: block;
  height: 6cm;
}
table#total {
  background: #f6f6f6;
  border-color: #f6f6f6;
  border-style: solid;
  border-width: 2cm 3cm;
  bottom: 0;
  font-size: 20pt;
  margin: 0 -3cm;
  position: absolute;
  width: 18cm;
}
View to generate PDF
In billing/views.py, create a view that fetches the invoice instance, renders the HTML template with context, then calls WeasyPrint to write the PDF and returns a HttpResponse of type application/pdf.
from django.shortcuts import get_object_or_404
from django.http import HttpResponse
from django.template.loader import render_to_string
from weasyprint import HTML, CSS
from .models import Invoice


def invoice_pdf_view(request, pk):
    invoice = get_object_or_404(Invoice, pk=pk)
    html_string = render_to_string("billing/invoice_detail.html", {"invoice": invoice})
    html = HTML(string=html_string, base_url=request.build_absolute_uri())
    pdf_bytes = html.write_pdf()

    response = HttpResponse(pdf_bytes, content_type="application/pdf")
    response["Content-Disposition"] = f"inline; filename=invoice_{invoice.number}.pdf"
    return response
Important: Notice the base_url=request.build_absolute_uri() (or use base_url=settings.STATIC_ROOT depending on your setup) so that relative static URLs in the template resolve correctly. Without that, images or CSS may not load in the PDF.
Remember in your urls.py to map:
from django.urls import path
from .views import invoice_pdf_view

urlpatterns = [
    path('invoice/<int:pk>/pdf/', invoice_pdf_view, name='invoice_pdf'),
]

# iin the main urls.py
from django.contrib import admin
from django.urls import path, include

urlpatterns = [path("admin/", admin.site.urls), path("", include("billing.urls"))]
Add the Invoice and the InvoiceItem to the admin.py file
from django.contrib import admin
from .models import Invoice, InvoiceItem

# Register your models here.
admin.site.register(Invoice)
admin.site.register(InvoiceItem)
Create a superuser and add some Incoices and InvoiceItems
python manage.py createsuperuser
# after the creation of the superuser
python manage.py runserver
Putting it all together
- Create your Invoice data via Django admin or via your app.
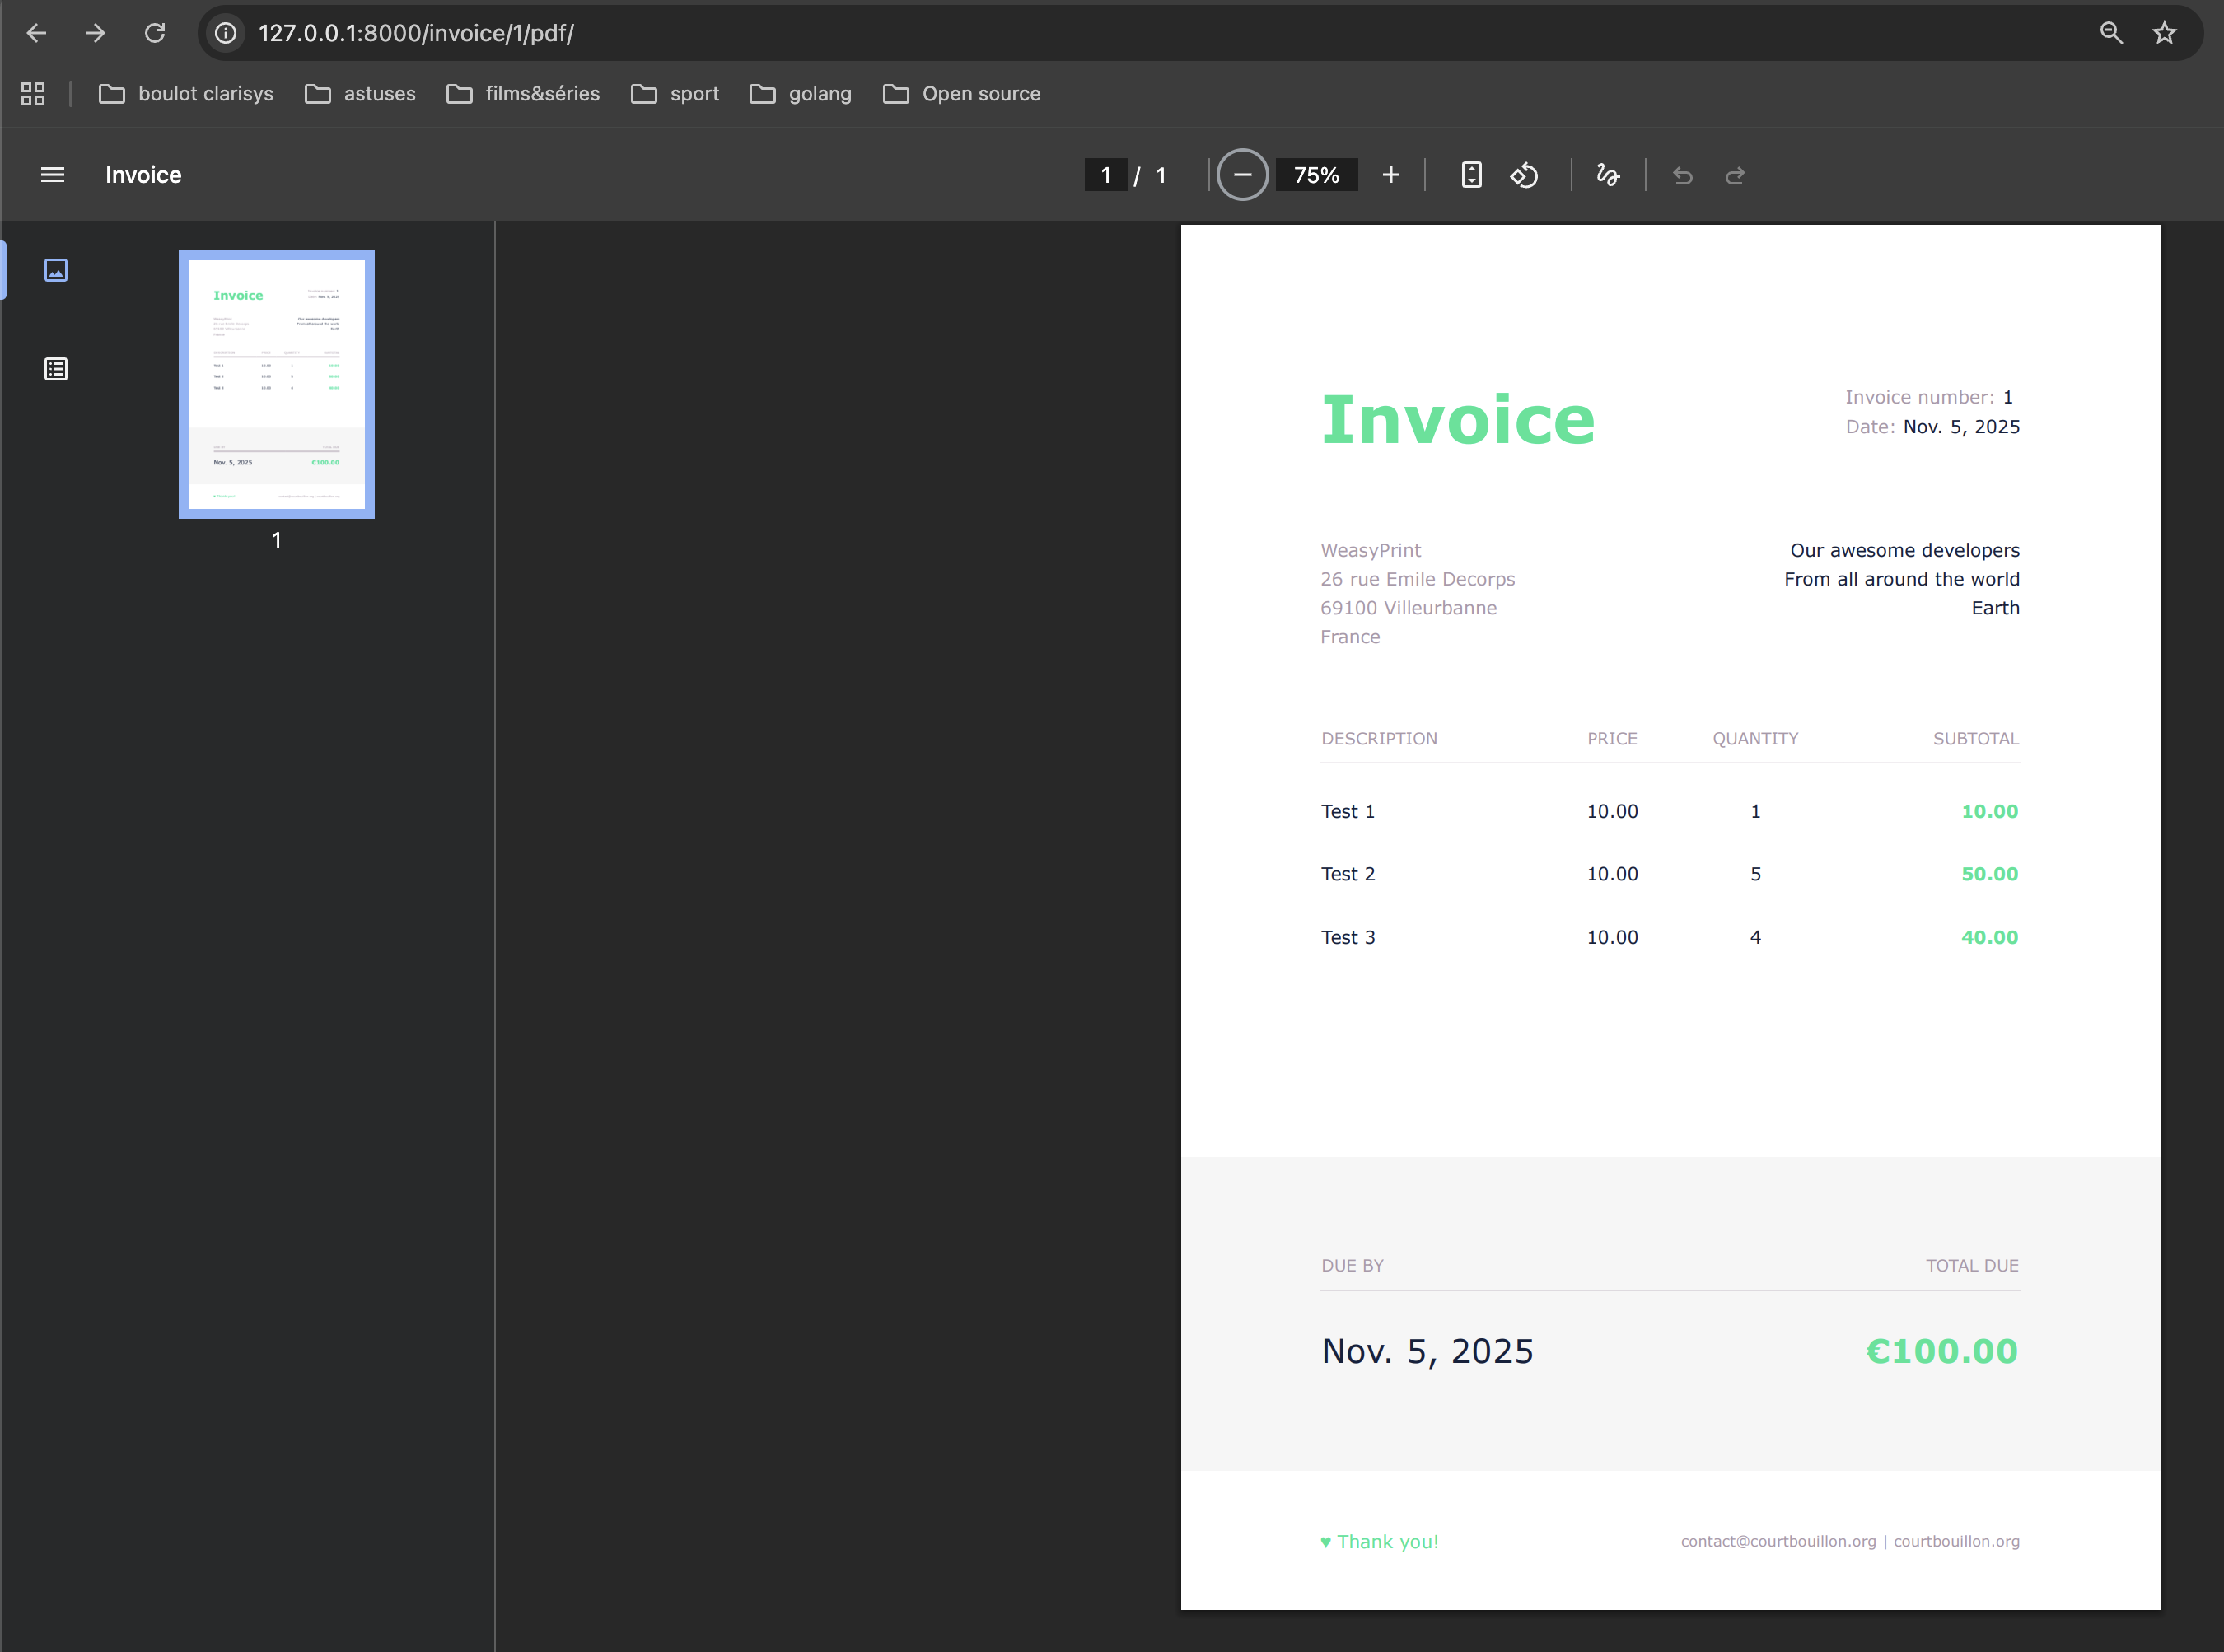
- Navigate to the URL
/invoice/<pk>/pdf/and you should get a generated PDF of the invoice, styled according to your template.
Overview
Additional Concerns
- Large documents & performance: If you have many invoices or a batch of PDF exports, you might offload generation to a background task (e.g., Celery) and store the PDF file. The django-weasyprint
READMEincludes an example of a Celery task. - Docker/Alpine: If you deploy in Docker (especially Alpine), ensure you install the native libraries for Pango/Cairo/Harfbuzz.
RUN apk add --no-cache jpeg-dev zlib-dev git gcc musl-dev python3-dev postgresql-dev
RUN apk add py3-pip py3-pillow py3-cffi py3-brotli gcc musl-dev python3-dev pango
RUN apk add py3-pip gcc musl-dev python3-dev pango zlib-dev jpeg-dev openjpeg-dev g++ libffi-dev
RUN apk add --no-cache --virtual .build-deps build-base linux-headers
Github
Conclusion
Integrating WeasyPrint with Django gives you a powerful combination for HTML-to-PDF document generation ideal for invoices, reports, receipts and more. By designing your template in HTML/CSS, you retain full styling control and avoid more cumbersome PDF libraries.
Take-aways:
- See the Weasyprint Documentation for more examples and use cases.
- You can Use the django-weasyprint package for a Django-friendly wrapper.
- Install the required system dependencies (Pango, Cairo, Harfbuzz) especially on non-standard Linux distros.
- Ensure static/media URLs resolve in the PDF context by using
base_urlor a custom URL fetcher. - Choose between inline download vs saving to disk or background tasks depending on your workflow.
Armed with this setup, you can now incorporate PDF invoice generation into your Django application with confidence, offering users polished downloadable documents with minimal overhead.