Integrate Django and Vite based Frontend

Introduction
What's the best way to add JavaScript to a Django project? Well, it really comes down to how much JavaScript you’re planning to use. On one end of the spectrum, you can just stick with plain old Vanilla JavaScript—drop it into your Django templates and call it a day. If you start writing a lot of boilerplate for basic interactions, jQuery might feel like a natural step up.
These days though, there’s growing interest in low-JavaScript approaches. Tools like htmx let you make HTTP requests without writing a single line of JavaScript. Pair that with Alpine.js, and you can sprinkle in some interactivity without the bloat.
Speaking of Alpine, ultra-lightweight frameworks are having a moment. Alpine.js comes in at just 7.1kb. Even leaner is Preact at 3kb. And if you like Vue, check out petite-vue—it’s built for progressive enhancement without going full SPA.
Of course, the big players like Vue, React, and Svelte are still widely used, but they typically live in a fully decoupled frontend setup.
But here’s the thing—you don’t have to go fully decoupled to use a modern JS framework. You can absolutely keep the Django monolith and just enhance your templates with JavaScript where it makes sense.
That said, you’ll need a reliable way to manage and bundle your JavaScript—both in development and for production.
Alright, let's start to code
Here in this example I will use Vue; feel free to use React, Svelte or whatever Vite based framework, so open a terminal and type as follow :
mkdir django-vite && cd django-vite
uv init .
uv add django
source . ./.venv/bin activate
django-admin startproject config .
.
├── config
│ ├── asgi.py
│ ├── __init__.py
│ ├── settings.py
│ ├── urls.py
│ └── wsgi.py
├── manage.py
├── pyproject.toml
├── README.md
└── uv.lock
2 directories, 9 filesCreate a Vue JS project
In the terminal create a new Vue project in the root folder of our Django project, here I choosed to call it webui
pnpm create vue@latest

┌  Vue.js - The Progressive JavaScript Framework
│
◇  Project name (target directory):
│  webui
│
◇  Select features to include in your project: (↑/↓ to navigate, space to select, a to toggle all, enter to confirm)
│  none

Scaffolding project in /home/malnossirat/Desktop/projects/mohamed/django-vite/webui...
│
└  Done. Now run:

   cd webui
   pnpm install
   pnpm dev
.
├── config
│ ├── asgi.py
│ ├── __init__.py
│ ├── settings.py
│ ├── urls.py
│ └── wsgi.py
├── manage.py
├── pyproject.toml
├── README.md
├── uv.lock
└── webui
├── index.html
├── jsconfig.json
├── package.json
├── public
│ └── favicon.ico
├── README.md
├── src
│ ├── App.vue
│ ├── assets
│ │ ├── base.css
│ │ ├── logo.svg
│ │ └── main.css
│ ├── components
│ │ ├── HelloWorld.vue
│ │ ├── icons
│ │ │ ├── IconCommunity.vue
│ │ │ ├── IconDocumentation.vue
│ │ │ ├── IconEcosystem.vue
│ │ │ ├── IconSupport.vue
│ │ │ └── IconTooling.vue
│ │ ├── TheWelcome.vue
│ │ └── WelcomeItem.vue
│ └── main.js
└── vite.config.js
8 directories, 28 filescreate two folders in the root folder of the project templates folder and static folder change settings to be like this
TEMPLATES = [
    {
        'BACKEND': 'django.template.backends.django.DjangoTemplates',
        'DIRS': [BASE_DIR.joinpath("templates")],
        'APP_DIRS': True,
        'OPTIONS': {
            'context_processors': [
                'django.template.context_processors.request',
                'django.contrib.auth.context_processors.auth',
                'django.contrib.messages.context_processors.messages',
            ],
        },
    },
]
//
STATIC_URL = '/static/'
STATICFILES_DIRS = [
    BASE_DIR.joinpath("static")
]
Now in vite.config.js, modify src under defineConfig to frontend
import { fileURLToPath, URL } from 'node:url'

import { defineConfig } from 'vite'
import vue from '@vitejs/plugin-vue'
import vueDevTools from 'vite-plugin-vue-devtools'

// https://vite.dev/config/
export default defineConfig({
  build: { // new
    emptyOutDir: true, // We clear the output dir every build
    outDir:"../static/webui", // we change the output dir to match django settings
    assetsDir:".", // we put all assets in the webui folder in the static folder
    rollupOptions: {
      input: "./src/main.js" // the entry point here is no longer the index.html but the main.js
    }
  },
  plugins: [
    vue(),
    vueDevTools(),
  ],
  resolve: {
    alias: {
      '@': fileURLToPath(new URL('./src', import.meta.url))
    },
  },
})
For further information about vite build system you can see the documentation here.
In our package.json, we add a few parameters to dev and build under scripts. This is what it looks like after adding them
{
  "name": "webui",
  "version": "0.0.0",
  "private": true,
  "type": "module",
  "scripts": {
    "dev": "vite build --mode development -w",
    "build": "vite build --mode production",
    "preview": "vite preview"
  },
  "dependencies": {
    "vue": "^3.5.13"
  },
  "devDependencies": {
    "@vitejs/plugin-vue": "^5.2.3",
    "vite": "^6.2.4",
    "vite-plugin-vue-devtools": "^7.7.2"
  }
}
add base.html in the templates folder => keep it simple:
<!DOCTYPE html>
<html lang="en">

<head>
    <meta charset="UTF-8">
    <meta name="viewport" content="width=device-width, initial-scale=1.0">
</head>

<body>
    {%block content%}
    {%endblock content%}
</body>

</html>
then add index.html file in the templates folder like this
{%extends 'base.html'%}

{%block content%}
// html code goes here
{%endblock content%}
Set the dynamic path to fetch js and css files
Let’s start with a quick refresher: context processors in Django are just functions that inject variables into the context of every template rendered. They're a great way to avoid repeating yourself—especially when you want certain data (like user info, app settings, or environment flags) to be available across all templates without explicitly passing them in each view.
Now, with that in mind, let’s build a custom context processor that helps us dynamically load our JavaScript and CSS files from an assets folder—handy when working with tools like Vite or managing Vue components.
Create context_processors.py in the config folder
This is where we’ll define a function that inspects the static/webui directory and returns the names of JS/CSS files we want to include in our templates.
from django.conf import settings

def webui_files(request):
    webui_assets_dir = settings.BASE_DIR.joinpath("static")
    js_files = [file.relative_to(webui_assets_dir) for file in webui_assets_dir.glob("**/*.js")]
    css_files = [file.relative_to(webui_assets_dir) for file in webui_assets_dir.glob("**/*.css")]

    return {
        "js_files":list(js_files),
        "css_files":list(css_files)
    }
Make sure to add the entry context_processors.webui_files under TEMPLATES - OPTIONS - context_processors in settings.py.
Below is what it looks like
TEMPLATES = [
    {
        'BACKEND': 'django.template.backends.django.DjangoTemplates',
        'DIRS': [BASE_DIR.joinpath("templates")],
        'APP_DIRS': True,
        'OPTIONS': {
            'context_processors': [
                'django.template.context_processors.request',
                'django.contrib.auth.context_processors.auth',
                'django.contrib.messages.context_processors.messages',
                'config.context_processors.webui_files',
            ],
        },
    },
]
The next step is to reference these variables in base.html so that they are available in every single template that is used. In the <head> section we iterate css_files template variable and load all the css files. Likewise in <body> section we iterate js_files and load all js files as <script> tags.
{% load static %}

<!DOCTYPE html>
<html lang="en">

<head>
    <meta charset="UTF-8">
    <meta name="viewport" content="width=device-width, initial-scale=1.0">
    {% for file in css_files %}
    <link rel="stylesheet" href="{% static file %}" />
    {% endfor %}
</head>

<body>
    {%block content%}
    {%endblock content%}
    {% for file in js_files %}
    <script src="{% static file %}"></script>
    {% endfor %}
</body>

</html>
Then we should add the path to the index.html page in config/urls.py
from django.urls import path
from django.views.generic import TemplateView
urlpatterns = [
path('admin/', admin.site.urls),
path('',TemplateView.as_view(template_name="index.html")),
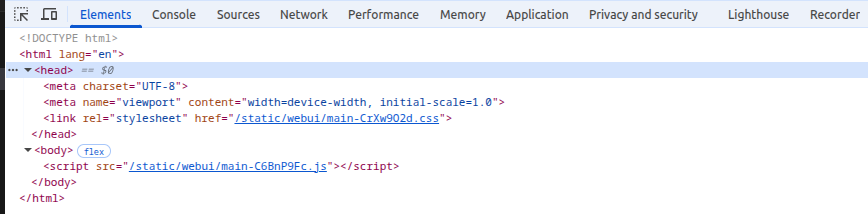
]after running django devserver. On inspecting the page, we should now see the following
Mount the Vue app in a django template
It’s that simple—just call a Vue component directly inside a Django template using an id attribute. In our frontend folder, we’ve got a main.js file where the Vue app gets mounted like this:
import './assets/main.css'

import { createApp } from 'vue'
import App from './App.vue'

createApp(App).mount('#app')
This tells Vue to hook into any element with the id="app". By default, this loads the App.vue component.
Now here’s where it gets fun. We simply drop a div with that ID into Django’s home.html template, right inside the {% block content %} section.
Here’s what the template looks like now
{%extends 'base.html'%}

{% block content %}

<div id="app"></div>

{% endblock content %}
When we refresh the page we see

Vue Router and Django urlpatterns
Now we will add vue router to our application to manage navigation in the frontend
pnpm add vue-router@4Then we will create two views Home.vue and About.vue
Home page
<template>
    <h1 class="title">Home Page</h1>
</template>

<script setup>
</script>
About page
<template>
    <h1 class="title">About Page</h1>
</template>

<script setup>
</script>
App.vue component
<script setup>
import NavBar from "@/components/NavBar.vue"
</script>

<template>
  <div class="container is-fluid">
    <NavBar/>
    <main>
    <RouterView />
  </main>
  </div>
</template>
In the sre folder add another folder called router ans create a file index.js with this content
import { createRouter, createWebHistory } from 'vue-router'

import HomeView from '../views/Home.vue'
import AboutView from '../views/About.vue'

const routes = [
  { path: '/', component: HomeView },
  { path: '/about', component: AboutView },
]

const router = createRouter({
    history: createWebHistory(),
    routes
  })


export default router;
Finally main.js will look like this
import { createApp } from 'vue'
import App from './App.vue'
import router from './router'
import 'bulma'
createApp(App).use(router).mount('#app')
Please note that I use Bulma for the some styling.
catch-all URL pattern
from django.contrib import admin
from django.urls import path, re_path
from django.views.generic import TemplateView

urlpatterns = [
    path('admin/', admin.site.urls),
    re_path(r'^(?P<path>.*)$',TemplateView.as_view(template_name="index.html")),
]
⚠️ Important : Ensure the catch-all route is the last pattern; Django matches URLs in order and stops at the first match.
Now we will add a simple Todo app in our Django:
python manage.py startapp todosmodels.py
from django.db import models

# Create your models here.
class Todo(models.Model):
    task = models.CharField(max_length=100)
    status = models.BooleanField(default=False)

    def __str__(self) -> str:
        return self.task
Add the todos app to INSTALLED_APPS in settings.py
INSTALLED_APPS = [
    //
    'todos',
]
In the terminal
python manage.py makemigration && python manage.py migrateadmin.py
from django.contrib import admin
from . models import Todo


admin.site.register(Todo)
views.py
import json
from django.http import JsonResponse
from django.views.decorators.http import require_GET, require_POST

from . import models

@require_GET
def todos_list(request):
    todos_qs = models.Todo.objects.all()
    todos = [{"id":todo.id,"task":todo.task,"status":todo.status} for todo in todos_qs]
    return JsonResponse(todos, safe=False)

@require_POST
def add_todo(request):
    data = json.loads(request.body)
    todo_ins = models.Todo(task=data['todo']['task'])
    todo_ins.save()
    todo = dict(id=todo_ins.id, task=todo_ins.task, status=todo_ins.status)
    return JsonResponse(todo, safe=False)
todos/urls.py
from django.urls import path

from . import views

urlpatterns = [
    path('', view=views.todos_list),
    path("create/", view=views.add_todo)
]
config/urls.py
from django.contrib import admin
from django.urls import path, re_path, include
from django.views.generic import TemplateView

from . import views

urlpatterns = [
    path('admin/', admin.site.urls),
    path('api/', include([
        path('todos/', include('todos.urls'))
    ])),
    re_path(r'^(?P<path>.*)$',TemplateView.as_view(template_name="index.html")),
]
Axios
Now we will install axios in the fronend
pnpm add axioswebui/http/index.js
import axios from "axios";
export default axios.create({
baseURL:"/api",
withCredentials:true,
xsrfCookieName:'csrftoken',
xsrfHeaderName:"X-CSRFToken",
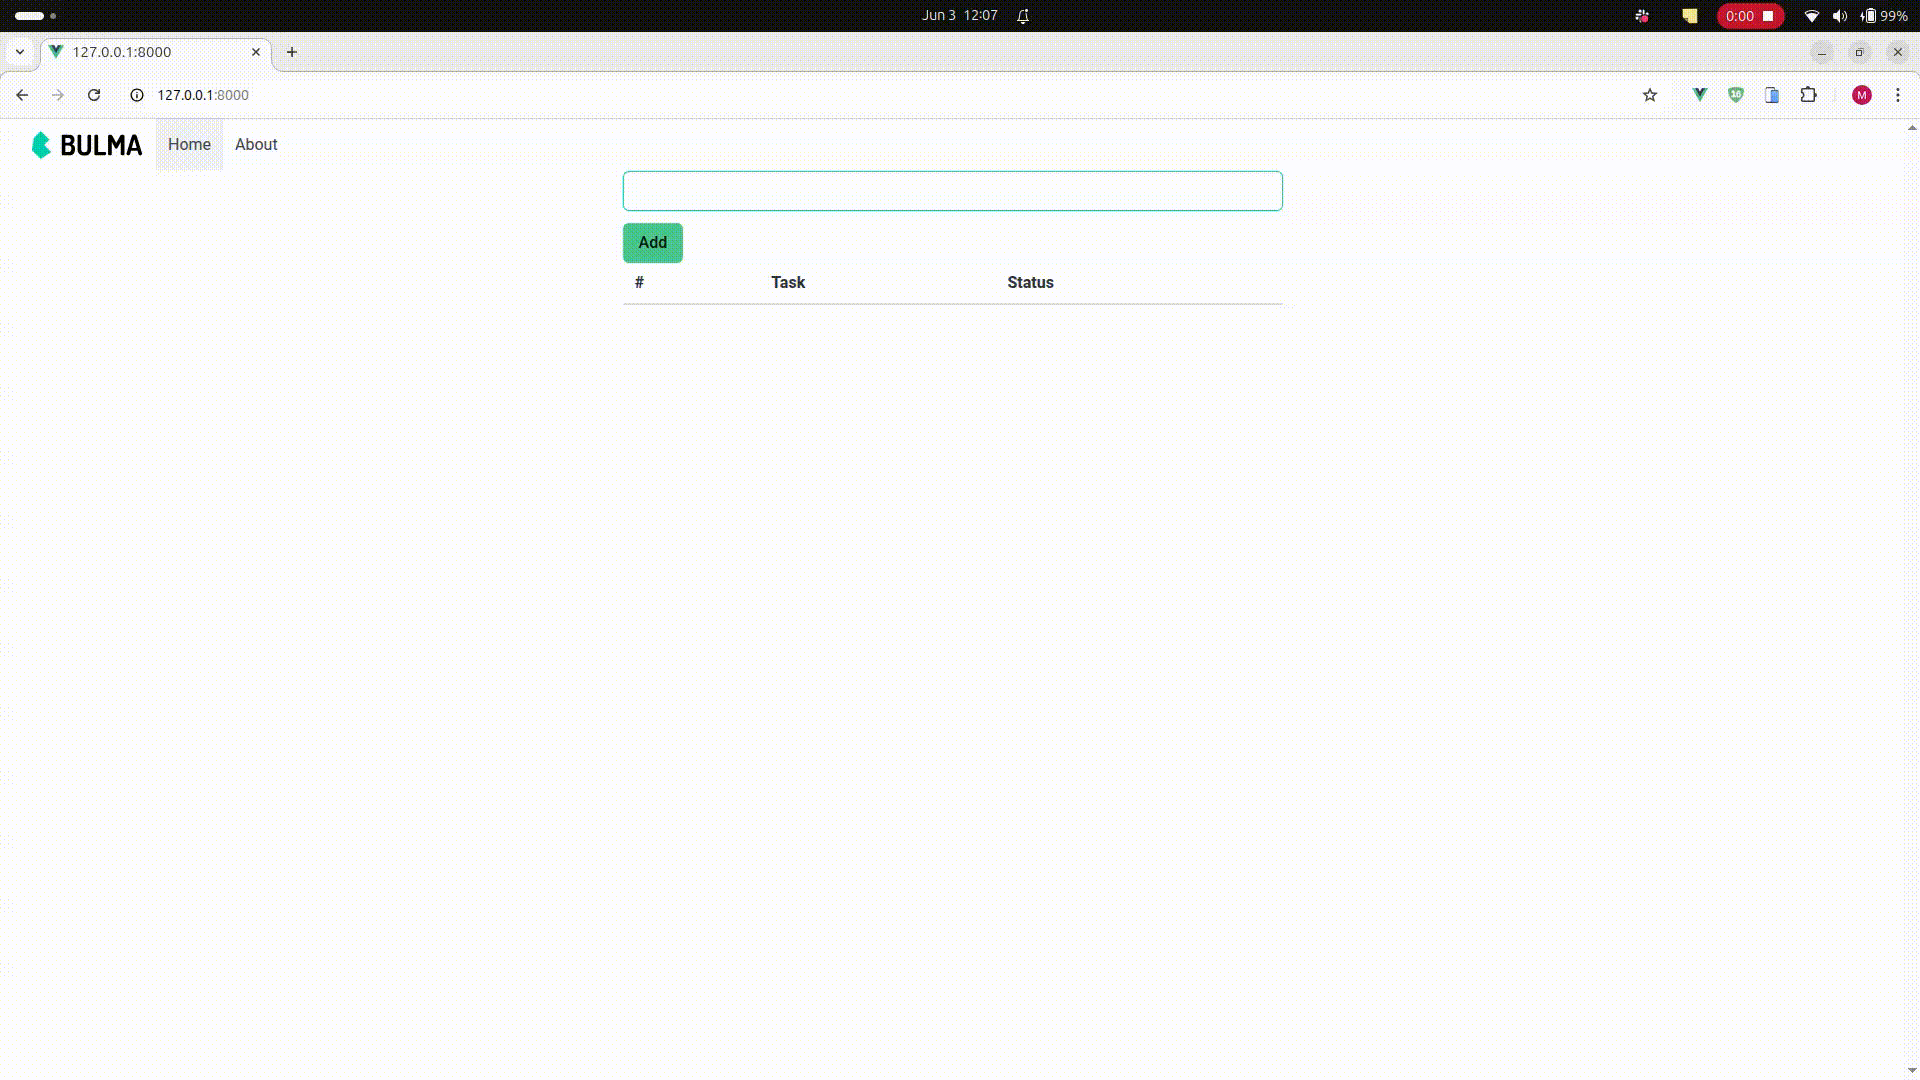
})Finally in the Home page we will add a simple form and table to list all our Todos:
<template>
    <div class="container">
        <div class="columns is-centered">
        <div class="column is-6">
            <form @submit.prevent = submitForm>
                <input class="input is-primary" v-model="todo.task"/>
                <input class="button is-success mt-3" type="submit" value="Add"/>
            </form>
            <table class="table is-fullwidth">
                <thead>
                    <tr>
                        <th>#</th>
                        <th>Task</th>
                        <th>Status</th>
                    </tr>
                </thead>
                <tbody>
                    <tr v-for="todo in todos" :key="todo.id">
                        <td>{{ todo.id }}</td>
                        <td>{{ todo.task }}</td>
                        <td>
                            <span v-if="todo.status" class="tag is-success">Done</span>
                            <span v-else class="tag is-warning">Waiting</span>
                        </td>
                    </tr>
                </tbody>
            </table>
        </div>
    </div>
    </div>
</template>

<script setup>
import { ref, reactive } from "vue";
import http from "@/http"
const todos = ref([])
const todo = reactive({task:""})

const submitForm = async () => {
   const res = await http.post("todos/create/", {todo})
   todos.value.push(res.data)

}

const getTodos = async () => {
    const res = await http.get("/todos/")
    todos.value = res.data
}
getTodos();
</script>
Result
Github Repo
Conclusion
Integrating Django with a modern frontend powered by Vite and Vue (or any other Vite-compatible framework like React or Svelte) provides the best of both worlds: Django’s robust backend capabilities and modern JavaScript’s dynamic, component-based UIs. This hybrid approach keeps the development stack maintainable while allowing for progressive enhancement.
By using Vite’s fast build tooling and Django’s templating and routing flexibility, you can avoid the overhead of a fully decoupled architecture while still delivering a responsive, interactive frontend. Context processors and static file handling allow for seamless asset management, and tools like Vue Router and Axios make frontend interaction and API communication simple and scalable.
This workflow empowers developers to build powerful, modern web apps without sacrificing performance, flexibility, or developer experience. Whether you're enhancing existing Django templates or building more complex SPA-like interfaces, the Django + Vite combo is a future-proof foundation for modern web development.
Here I tried to this without the need of third party packages, you can see how Django Vite Package do thins if you need the HMR in the front end dev mode, Also Django Rest Framework or Django Ninja for all the serialization and the validation.